Sopes with Black Beans & Cheese


The Recipe

Serves: 2 people
Preparation: 30 minutes
Assembly Time: 10 minutes

Sopes are not as common as tacos on the streets of Mexico, however, they are a more robust and portable snack, and just as delicious.


One cannot talk about sopes without talking about maize and nixtamilsation. The maize crop was a fundamental element in Aztec societies and remains at the forefront of Mexican cuisine. Before colonisation, maize was processed by a method known as nixtamalisation, not only did treating the corn with an alkaline solution (lime water). give it a unique taste, it also enhanced the nutritional content of the maize (specifically niacin), which was key to preventing pellagra.

The Aztecs prepared maize in many different forms, and the most common form that is used today is masa harina. It is a glorious ingredient that can be made from a myriad of corn types and is transformed into cakes, tortillas, gorditas, tamales, champurrado and also, of course, sopes.

Sopes are a much thicker version of a tortilla and are reasonably small in size (5-10cm), they have a ‘lip’ to hold ingredients that are layered on top of them, which range from beans, shredded pork, chicken, cheese, avocado, herbs and hot sauce.

They are not as common as tacos on the streets of Mexico, however, they are a more robust and portable snack, and just as delicious.

Masa harina (dough flour) is the base of sopes, which then has water added to it to create the dough. The dough is pressed, dry-fried, shaped and fried. There is no need to add salt or herbs to sopes. As simple as the base may seem, the process of nixtamilsation gives the corn an earthy and slightly tangy flavour profile.


INGREDIENTS

SOPES
170g masa harina
300g (or less) of warm water
100g olive oil

TOPPINGS
80g/1/2 brown onion
400g black beans (cooked)
1.5 tsp toasted cumin powder
1/2 tsp smoked paprika
1/2 tsp sea salt
1 medium avocado, sliced
100g crumbled queso fresco OR Danish ‘feta cheese’
15g chopped coriander
hot sauce

METHOD

  1. Finely dice the onion and cook until soft in a medium-heat fry pan with a good pour of extra virgin olive oil (you can also use butter or pork fat)

  2. Add in beans and cook until soft, add about 20-50mls of water and smash the beans with a fork so they form a chunky paste (you can smash them more if you prefer a smoother texture, heck, blend them if you like!)

  3. Add in cumin, smoked paprika and salt

  4. Mix until combined, add more spices to taste

  5. Take off the heat and start to make the sopes.

  6. Mix water and masa harina to form a dough. It should not be too sticky and malleable

  7. Roll into 50g size balls and place between two baking sheets, plastic or in a tortilla press.
    Gently press until the disc is around 1cm thick and 8cm wide. Repeat

  8. In a cast iron pan, heat on medium, and dry fry the discs, they can be slightly brown on each side

  9. While they are still warm, pinch the edges to create a ‘lip’ around the outside of the discs

  10. Heat the oil in a pan on a medium-high heat and cook the sopes on each side until crispy

  11. Set aside and top with bean mixture, sliced avocado, cheese, coriander and hot sauce

  12. Indulge in the simple delights of Sopes… and you can read more about it HERE.


    Questions? Comments? Let me know, I’d love to hear from you.

     Buen Provecho!


Ready to bake? Try some of these quick and easy recipes..

Jicama & Apple Salad


The Recipe

Serves: 2 people
Preparation: 10 minutes
Assembly Time:1 minute!

“From its glorious origins in Mexico, Central and South America, Jicama made the long journey to Asia in the 17th Century”


Amongst the plethora of street stalls in Mexico City, I remember the fruit carts that were neatly prepared, and too irresistible to walk past without purchasing a cup of jicama, mango, or papaya sprinkled with chilli, salt, and a squirt of juicy Mexican lime. This was not the first time I had eaten jicama, but it was the first time I had seen it served in this way – cut like thick fries and eaten raw.

Although Jicama looks like a root vegetable, it is the root of a pea plant (Fabaceae family) that spouts out from the top of it. The crispy and juicy Mexican turnip, Jicama (pronounced “Hee Ka Ma”) is derived from the Nahuatl word xīcamatl.

Where is Jicama from?

 The origins of this vegetable lie in Mexico, Central and South America and it is known to be one of the oldest cultivated crops – even the Mayans munched on it back in the day. There have been traces of Jicama found in archaeological sites in Peru that date back around 3000 years.

 Jicama most probably journeyed from the Americas to Asia with the help of the Spaniards. It is now a common ingredient found all over the world and is a popular element in dishes from popiah in Singapore to rojak in Indonesia.


What does Jicama Look Like?

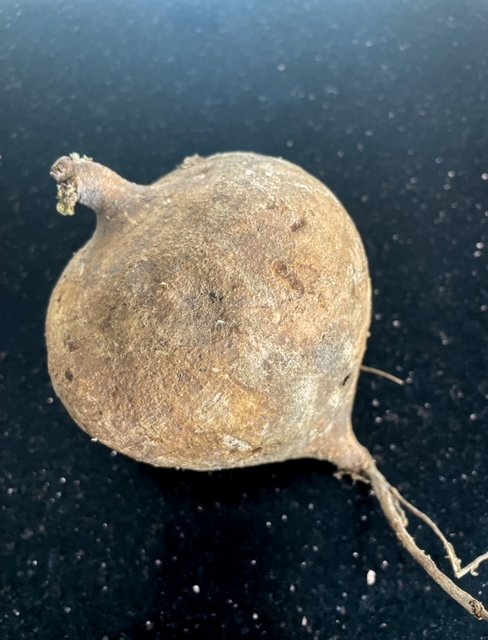
With a rustic exterior, Jicama has fibrous skin yet a fleshy interior. It is made up of around 90% water and it has a glorious ability to absorb flavours ever so well.

What does Jicama Taste Like?

If you haven’t tried jicama, you will be pleasantly surprised. With its deceiving root vegetable costume, it is not at all starchy, yet has a juicy texture similar to a nashi pear with a little bit more structure. It can be eaten raw or cooked and thrown into savoury and sweet dishes.

Enough of the history lesson, here’s the recipe.


INGREDIENTS

Salad
280g jicama
60g / half red apple
30g water celery or watercress (rocket works too!)
1 tbsp / 10g raisins
1 tbsp / 5g pumpkin seeds

Dressing
1.5 tbsp lime juice
½ tsp pepper
¼ tsp salt
2-3 tbsp extra virgin olive oil
1 tbsp habanero hot sauce (or any sauce you wish)

METHOD

  1. Wash jicama, red apple, and water celery/watercress.

  2. Trim the thick stalks of the water celery and save later for a veggie stock.

  3. Peel jicama and cut into 1cm thick sticks

  4. Keep the peel on the red apple and slice it a little thinner than the jicama

  5. Mix the salt and pepper in the lime juice and mix until the salt has slightly dissolved, add in hot sauce and olive oil.

  6. Mix until all dressing ingredients are combined.

  7. Place the dressing, apple, and jicama in a bowl and mix to thoroughly coat them, allow to sit for a minute or two.

  8. On a plate, place half the jicama/apple mixture and then add some of the water celery.

  9. Pile the rest of the jicama and apple and then the watercress. Arrange as you wish!

  10. From a reasonable height, flutter the pumpkin seeds and raisins down on the salad.

  11. Add a small amount of the remaining dressing to finish.

  12. Enjoy the crunchy and fresh simplicity of this healthy salad.

  13. For extra oomph, feel free to add some crumbled fetta cheese.


    Questions? Comments? Let me know, I’d love to hear from you.

     Buen Provecho!


Try some mains to go with this Jicama Salad!

SOME OF MY FAVOURITE HOT SAUCES ON AMAZON

Panko Tofu with Edamame Hummus


The Recipe

Serves: 2-3 people
Preparation time: 20 minutes
Cooking Time: 20 minutes

In the 13th century, the Arabic cookbook "Kitab Wasf al-Atima al-Mutada" (The Description of Familiar Foods) described a dish similar to hummus made from chickpeas, vinegar, and spices. In the 16th century, the Turkish chef and traveler Evliya Celebi described a popular dish in Cairo made from mashed chickpeas and tahini.

I love hummus in any shape or form. It’s just such a great dip, spread or condiment found in various cuisines in the Mediterranean and the middle east. So why edamame hummus???

Despite my heritage, I really don’t cook much Asian food as I have essentially grown up with a ‘white’ palate. I had leftover miso and tahini so I thought I would make an Asian (ish) style version of one of my favourite dips.

Edamame finds its origins in China over 2000 years ago. They are essentially fresh soybeans and are commonly eaten in Japanese restaurants, steamed or boiled in the pod. Soybeans have provided the backbone for many Japanese delicacies such as miso paste and soy sauce for over 1,000 years. Eating edamame fresh and green started around the late 800s. The idea of eating soybeans fresh with a glass of cold beer is a tradition that has spread around the world and is a common, iconic dish in many Japanese restaurants. Edamame is usually found in the freezer section as once picked, they have quite a short shelf life. You can buy them in or out of the pods for convenience and depending on what you want to use them for.

It is a light, vegan dish that is great for communal dining and adds a nice spin to the original hummus made from chickpeas.

THE INGREDIENTS

Hummus
100g lightly blanched de-shelled edamame
10g tahini
15g white miso
50g apple cider vinegar
Half a clove of finely chopped garlic
100g olive oil

Panko Tofu
40g panko breadcrumbs
250g firm tofu
50g rice flour
4g shichimi togarashi*
2g sea salt
1 egg
Vegetable oil

THE METHOD

  1. Blend all ingredients in a food processor until nice and smooth

  1. If needed, add 25-50mls extra water to smooth out the hummus

  2. Set aside while you make the tofu cubes

  3. Cut the tofu into 1-inch cubes and set aside

  4. Put the panko crumbs in a shallow bowl

  5. Whisk the egg and also place in another bowl

  6. Mix the shichimi togarashi, flour and sea salt and place in a bowl.

  7. So, now you have your line up tofu cubes, seasoned flour, egg and finally panko crumbs

  8. Toss the cubes in the flour, then egg and coat in panko crumbs. Set aside.

  9. In a medium saucepan, fill up with the oil – deep enough to cover the tofu and allow to heat up to about 180’C. If you throw in some panko crumbs and they sizzle on impact, you are good to go.

  10. Fry the tofu cubes until golden brown, and place on a tray with a paper towel to absorb any excess oil.

  11. Schmear the hummus on a plate, top with the tofu and sprinkle with some black sesame seeds.

  12. Let me know how you go with this recipe!!

    * shichimi togarashi is a wonderfully bright, spicy and unique blend that can be sprinkled on ramen, steaks, salads and also this dish! It commonly is a mix of Japanese sansho pepper, black and white sesame seeds, ginger, nori and dried citrus peel

Sopa Azteca

The Recipe

Serves: 6-8 people
Preparation: 20 minutes
Cooking Time: 30-40 minutes

The modern version of Sopa Azteca emerged during the Spanish colonial period, when the Spanish introduced new ingredients to the indigenous cuisine of Mexico. In particular, the soup's use of tortillas is believed to have been influenced by Spanish bread.

Sopa de Tortilla or Sopa Azteca is one of the most comforting dishes you could eat in Mexico. With the wonderful crunch of tortillas, buttery avocado and the chilli kick – it is balanced out wonderfully with a good squeeze of fresh lime.

This extremely easy and delicious dish was originally made with chicken stock and shredded chicken, topped with Mexican crema – this version of Sopa de Tortilla is vegetarian and completely vegan if you leave out the sour cream. Depending on the area the soup is made, Ancho or Pasilla chillies are usually used in this dish, however, they are hard to come by in Singapore, hence the canned chipotle chillies and the level of spice can be tailored to your taste buds.

THE INGREDIENTS

8-10 lovely ripe tomatoes (roughly chopped)
OR 2 cans of chopped tomatoes
350g Small can of chipotles in adobo (I used la Costena brand)
200g/ 1 medium white onion
2 cloves garlic (finely chopped)
1 tblsp tomato paste
2tblsp olive oil
600 mls vegetable stock
Salt to taste

Garnish
Chopped coriander leaves
Smashed tortilla chips
Finely chopped onion
2- 3 avocados/sliced
Lime wedges
Sour cream (optional)

THE METHOD

  1. Finely chop onion and reserve about ¼ of them for the garnish

  2. Blend the chipotles in adobo can to make a paste, set aside

  3. In a medium saucepan, heat oil and fry the onion until transparent, add garlic and mix through

  4. Add tomatoes and mix until the onion mix has become acquainted

  5. Throw in tomato paste, half of the chipotle paste and half the vegetable stock

  6. Allow the ingredients to mingle and reduce, simmering at a medium heat for about 20 minutes, stirring occasionally

  7. Add the remainder of the stock and reduce for another 10 minutes. The soup should be the consistency of a thick tomato pasta sauce.

  8. When the soup is ready, season with salt to taste and add some more chipotle paste if you need more heat.

  9. Place in warm bowls and garnish with chopped tortillas, coriander, avocado slices, onion and sour cream if your heart desires.

Beef Manti with Yoghurt Beetroot Sauce

The Recipe

Serves: 4-6 people
Preparation: 60 minutes
Cooking Time: 20 minutes

Manti is a popular dish in Turkey and other parts of Central Asia and the Middle East, and it is often enjoyed as a main course or as part of a larger spread of meze (appetizers). The dish has a long history and is believed to have originated in the region of Central Asia that is now modern-day Uzbekistan.


What is a dumpling?

Dumpling. “A small ball of dough cooked and eaten with soup or meat, or a filling of fruit, meat, or vegetables covered with dough and steamed, baked, or fried. “Cambridge Dictionary

It is an extremely broad definition, however exciting as dumplings are filled with a whole world of endless combinations and possibilities. It is safe to say that most countries have their own versions of the above definition – empanadas in Argentina, dumplings in China, Pierogi in Poland and even Spaetzle in Germany.

The History of Dumplings

The second Imperial Dynasty in China (206BC-220AD) also known as the Han Dynasty, was the period when dumplings were apparently invented. The story of Zhang Zongjian, a renowned Chinese medicine practitioner, developed the dumpling or Jiaozi after seeing the people of his village ailed by frostbite, particularly around their ears.

His magical cure was dumplings the shape of ears, filled with meat, chilli and medicinal herbs. Those inflicted by illness were instructed to have these dumplings in hot soup twice a week which eventually cured them – the dumplings were so delicious that the villagers continued to make them in future winters to come.

The presence of dumplings was prevalent in 13th Century Turkey and were named “Manti”. These Manti were brought to Central Turkey by Mongol horseman. These dumplings were either dried or frozen, making it easy to transport and convenient to boil and eat wherever the horsemen camped on their journey towards Anatolia.

Gnocchi, in the form of a crumbed bread and water dough was first around in the Renaissance period in Italy. This was the first documented evidence of ‘dumplings’ in Europe.

Dumplings were originally a resourceful way to stretch out expensive proteins by bulking it up the with vegetables such as cabbage and potatoes and then wrapping up the filling in a heavy dough resulting in an economical tasty parcel of food for many. Each country around the world has their own take on the humble dumpling.

No matter what country we turn to or what time in history post Han Dynasty, the world has been enjoying and developing their own style of dumplings making each dish unique in cooking technique, ingredients used and various styles. Enjoyed with tea, in soup, in desserts or on their own, there is not one person in this world that could not love at least one type of dumpling.

I have gone back in time to Turkey and created a dish based loosely on the Manti dumpling. Adding my favourite spice – cumin and a Southern Italian flair with the inclusion of raisins and pine nuts. The sauce is usually yoghurt based with chilli oil, however I have added some roasted beetroot for a wonderful touch of colour. It requires some patience to make the dumplings, but I guarantee the results will be definitely worth it!


THE INGREDIENTS

DOUGH
250g plain flour
1 medium egg
2 tsp olive oil
¼ tsp salt
100mls cold water

SAUCE
4g/1 clove garlic
300g beetroot
80g Greek yoghurt
¼ tsp salt
1 tsp olive oil
1 tsp fresh dill

FILLING
200g minced beef
20g raisins, chopped
15g toasted pine nuts, chopped
½ tsp salt
¾ tsp ground cumin
¼ tsp cinnamon
½ tsp paprika
1 tbsp olive oil
50g red onion, finely chopped
1 tbsp chopped parsley
1 tbsp chopped dill

GARNISH
Dill
Chilli oil
Black sesame seeds
Thick Greek yoghurt

THE METHOD

  1. In an electric mixer with paddle attachment, mix flour, salt, olive oil and egg.

  2. Mix until combined and then slowly add in the cold water. Mix until the dough is smooth, wrap in cling film and refrigerate for 1 hour.

  3. Wrap the whole beetroot, skin and all in aluminium foil and bake in the oven at 180’ for 1 hour or until the beet is cooked through (insert knife to check). Allow to cool, peel the beetroot and roughly chop into 2cm pieces.

  4. In boiling water blanch the peeled garlic clove for a few minutes. Blend beetroot, garlic, yoghurt, salt, olive oil and dill then strain the mixture, making sure all lumps are out of the sauce.

  5. For the beef filling, mix all ingredients together in a large bowl, set aside.

  6. When the dough is ready, take out and roll into a 3mm thick rectangle. Using a sharp knife, cut squares about 2cm in length.

  7. Place a small amount of the filling in the centre of the squares. Pinch dough together from the sides to the centre to form a cross shape at the join of the manti. If the dough has trouble sticking together, moisten the edges with a small amount of water.

  8. Make sure the joins are completely sealed so the manti doesn’t burst when cooked. Repeat until all the dough and filling has been used. Set in the fridge until ready to cook.

  9. Boil a large pot of salted water. Place in manti carefully, do not overcrowd the saucepan and allow them to float to the top. When they are ready, take the manti out with a slotted spoon and rest on a plate.

  10. Slightly warm the beetroot sauce and place at the bottom of a shallow dish. Place the manti on the sauce and garnish with a few blobs of thick yoghurt, black sesame seeds, dill sprigs and a drizzle of chilli oil.

  11. This dish can be served at room temperature

Pork & Fennel Tortellini in Tomato Beef Broth

The Recipe

Serves: 6 people
Preparation: 1 hour
Cooking Time: 1 hour

“The essence of a good muffin is the muffin top, without it, we can just call it a naked cupcake.”

If you know me, you would know how obsessed I am with all things Sicilian. I guess there are times in our lives when we travel and certain experiences, people and places stick to your memories like glue. I feel that these experiences can define who we are as individuals as they represent a small piece of time in our lives where we felt happiest or completely fulfilled.

Sicily was I place I had always wanted to travel to and I found it to be one of the most magical parts of the world I have ever been. I learned how to discover, explore and laugh out loud again.. for this, it will remain forever etched into my heart.

Sentiments aside, let's talk about food. Sicilian food is some of the best I have ever tried in my life (yes I am being biased - but why not?). It is an amalgamation of Arab, Greek, French and Spanish cultures which makes it so unique and with it being situated in the Mediterranean sea it has an abundance of glorious, wonderful produce.

Tortellini en brodo is actually a northern dish, however, I first tried it in Sicily - this recipe is loosely based on a version of the traditional dish I ate in Palermo.

INGREDIENTS - Pasta Dough
6 eggs
600g plain flour

INGREDIENTS - Tomato Beef Broth
100g fennel stalks, roughly chopped
4 small garlic cloves or 8g, chopped finely
120g yellow onion, finely chopped
500g ripe Roma tomatoes, roughly chopped
1500g good beef stock
Salt and pepper to taste
20mls olive oil for cooking the onions


INGREDIENTS - Pork and Fennel Filling
300g pork mince
80g bacon or pancetta
½ tsp fennel seeds
100g fennel, finely chopped
1 clove garlic (4g)
20g red onion
1tsp sea salt
1 tsp black pepper
½ tsp sweet paprika
40g grated parmesan cheese

METHOD
Place flour in a bowl or on a flat surface
Crack the eggs into the flour one at a time, combining the egg into the flour mixture each time
Knead the dough until it is completely smooth, for about 10 minutes (this all can be done in an electric mixer)
Wrap in cling film and refrigerate for a minimum of 30 minutes.


METHOD
Fry the onions in the olive oil until translucent.
Fry the fennel stalks and then the garlic
Add in the tomatoes and let them cook slightly
Add in the beef stock and cook over low heat until the liquid has reduced by half
Allow the mixture to cool slightly before blending (explosions will happen otherwise!)
Blend the mixture and then fine-strain it
Set aside


THE METHOD
Cook the onion in olive oil until translucent
Add pancetta and cook through
Add the garlic, fennel seeds, fennel, onion and pork mince
Cook mixture through before adding the salt, pepper and paprika
Taste the mixture and add more seasoning if needed
Set aside and allow the mixture to cool completely
Blend in a food processor until fine.

GARNISH
Parmesan Cheese
Fennel Fronds
Sliced fennel

ASSEMBLY AND COOKING

When the pasta is set, roll it out with the pasta machine to the finest setting.
Cut circles with a round cookie cutter about 8cm in diameter
Place a teaspoon of the pork mixture into the centre of the circle
Wet one side with water and fold over into a semi-circle. Make sure all the edges are sealed tightly. Fold the two far edges of the semi-circle onto one another. Fold the excess of the semi-circle back down onto the base.

Bring a pot of salted water to the boil

Add in tortellini until they float to the top. Strain off the water

Heat the tomato stock in a separate pot

Place the tortellini in a bowl, spoon over the tomato stock

Garnish with parmesan cheese, thinly sliced fennel, fennel fronds, and olive oil.

Beetroot & Cumin Soup


The Recipe

Serves: 2 people
Preparation: 15 minutes
Cooking Time: 30 minutes

Eating a variety of colours every day and making your plate colourful will ensure you have a variety of nutrients to balance out your meal. No need to get too technical with nutrition.. just look at your plate and if it looks bland – ADD MORE COLOUR!!


I love stumbling upon naturally coloured purple fruits or vegetables. As well as looking stunning in a dish they are packed with lots of stuff that’s good for you!!! From purple carrots in Australia, purple cabbage in Mexico and purple broccoli in Sicily…. I love to paint my plate with colour!!!

We are surrounded by colours each and every day and colour psychology plays a huge role in our lives. White is known worldwide as the symbol of peace, sincerity and purity. Red (my favourite colour) is exciting, evoking feelings of lust and love (think Valentines Day). If we are happy and are in a good mood we are more likely to dress in bright and colourful clothes, if it is dark and cold outside, we tend to wear blacks, greys and browns.
The same principle of colour can apply to the foods we eat. Eating a variety of colours everyday and making your plate colourful will ensure you have a variety of nutrients to balance out your meal. No need to get too technical with nutrition.. just look at your plate and if it looks bland – ADD MORE COLOUR!!

Phytochemicals (antioxidants, phytonutrients, flavones, catechins) are found in all plant foods; fruit, vegetables, grains and legumes. They help plants by protecting them from environmental toxins such as insects, UV radiation and fungi that causes diseases. It is believed that these components of phytochemicals have the same benefits to the human body.
Today we are making a simple purple soup which wasn’t lonely with a side of Manoush Bread. It is easy to prepare (that is if you don’t have an explosion of soup mid way, in which case you could be cleaning up for a good hour) and can keep in your fridge up to about a week.
So, a bit about the red/purple group of fruits and vegetables….

 Reds & Purples

This colour group of foods contain anthocyanins which are powerful antioxidants that are know to boost brain activity, possess anti-inflammatory properties, may cut down heart disease and stroke by inhibiting clot formation and can also promote healthy aging of the eyes.
Examples: Aubergine, Beetroot, Berries (blackberries, blueberries, redcurrants etc), Cherries, Chillies, Plums, Prunes, Purple or red grapes, Red apples (with skin), Red cabbage, Red pears (with skin), Red peppers, Red wine, Strawberries, Cranberries


INGREDIENTS

2 tsp cumin seeds
2 tsp sea salt
15g/ 1 tblsp butter
85g/ 1/4 white onion, roughly chopped
2 garlic cloves, roughly chopped
400g/ 1 large beetroot, peeled and cut into cubes
400 mls/2 cups water
stalks from the parsley leaves, finely chopped
handful of parsley leaves
40g/2 generous tblsp cream
1 tsp pepper, ground coarsely

METHOD

  1. Toast the cumin seeds in a dry deep saucepan or pot until they become fragrant.

  2. Add butter, onion, garlic and parsley stems. Stir and cook until the onions are clear.

  3. Now add the chopped beetroot and stir for a good 5 minutes and add the salt

  4. Pour the two cups (400mls) of water into the pot. Cover and cook on a medium heat for 20-30 minutes until the beetroot becomes soft.

  5. Allow to cool slightly before transferring to the blender.
    Blend the soup a bit at a time to ensure it is a smooth texture.

  6. Be careful to hold the lid and don’t poke anything in the blender to try and mix the soup. Otherwise, it will be disastrous....!!!!

  7. For the peppered parsley cream, mix cream, finely chopped parsley, pepper and a pinch of salt in a bowl. Mix until all the ingredients are well combined

  8. Serve the soup warm with a good dollop of cream – might also be enjoyable dipping some MANOUSH bread in it…


Coconut and Squash Soup

I have had a craving for Thai food of late..

I am not saying that this is a Thai recipe – by no means it is authentic to the cuisine, however, it has a few reminiscent flavours; mixing sour lime, sweet sugar, spicy chilli, coconut and earthy squash.

At Mercado Medellin in La Roma, there is a stall where I buy all my veggies from. They have a particularly huge display of pumpkins and squashes and today I was feeling like, why not?

ingredients soup.jpg

It’s super easy and if you fancy it, fridge or freeze it for later on.

THE RECIPE
Preparation Time: 20 minutes
Cooking Time : 30 minutes
Serves : 4

The Ingredients
3 cloves of garlic, smashed and roughly chopped
a thumb sized piece of skinned ginger (roughly chopped)
half a red chilli, roughly chopped (omit or add more depending on how spicy you want it and what kind of chilli you are using)
1/4 large white onion, roughly chopped
Small butternut squash (about 500g)
1-2 roma tomatoes
A handful of fresh coriander – roots and all
1 can (400mls) coconut milk
Juice of 1 fresh lime
2 tbsp muscovado sugar
1-2 tsp salt (to taste)

The Method
Take the garlic, ginger, onion and chillies. Fry on a medium heat in a little bit of oil for 2-3minutes. Chop the roots of the coriander and add this to the mix. Stir for a further 5 minutes. Add salt.

Skin, deseed and roughly chop the butternut squash. While you are doing this – go ahead and roughly chop the tomato too.

Add the tomato to the mix, stir until the juices start to bubble nicely and then add the squash. Stir a little again then add the coconut milk. At this point, go ahead and add the sugar.

Cover loosely and let the soup simmer nicely on a medium – low heat until the squash has softened.

Add the lime, transfer to a blender and whizz!. While doing this add the roughly chopped coriander leaves so the soup is nice and smooth.
It’s ready now. Eat and enjoy. This is also a great base for a sauce so you can add chicken, chunks of vegetables and mix it with rice.