Sopes with Black Beans & Cheese


The Recipe

Serves: 2 people
Preparation: 30 minutes
Assembly Time: 10 minutes

Sopes are not as common as tacos on the streets of Mexico, however, they are a more robust and portable snack, and just as delicious.


One cannot talk about sopes without talking about maize and nixtamilsation. The maize crop was a fundamental element in Aztec societies and remains at the forefront of Mexican cuisine. Before colonisation, maize was processed by a method known as nixtamalisation, not only did treating the corn with an alkaline solution (lime water). give it a unique taste, it also enhanced the nutritional content of the maize (specifically niacin), which was key to preventing pellagra.

The Aztecs prepared maize in many different forms, and the most common form that is used today is masa harina. It is a glorious ingredient that can be made from a myriad of corn types and is transformed into cakes, tortillas, gorditas, tamales, champurrado and also, of course, sopes.

Sopes are a much thicker version of a tortilla and are reasonably small in size (5-10cm), they have a ‘lip’ to hold ingredients that are layered on top of them, which range from beans, shredded pork, chicken, cheese, avocado, herbs and hot sauce.

They are not as common as tacos on the streets of Mexico, however, they are a more robust and portable snack, and just as delicious.

Masa harina (dough flour) is the base of sopes, which then has water added to it to create the dough. The dough is pressed, dry-fried, shaped and fried. There is no need to add salt or herbs to sopes. As simple as the base may seem, the process of nixtamilsation gives the corn an earthy and slightly tangy flavour profile.


INGREDIENTS

SOPES
170g masa harina
300g (or less) of warm water
100g olive oil

TOPPINGS
80g/1/2 brown onion
400g black beans (cooked)
1.5 tsp toasted cumin powder
1/2 tsp smoked paprika
1/2 tsp sea salt
1 medium avocado, sliced
100g crumbled queso fresco OR Danish ‘feta cheese’
15g chopped coriander
hot sauce

METHOD

  1. Finely dice the onion and cook until soft in a medium-heat fry pan with a good pour of extra virgin olive oil (you can also use butter or pork fat)

  2. Add in beans and cook until soft, add about 20-50mls of water and smash the beans with a fork so they form a chunky paste (you can smash them more if you prefer a smoother texture, heck, blend them if you like!)

  3. Add in cumin, smoked paprika and salt

  4. Mix until combined, add more spices to taste

  5. Take off the heat and start to make the sopes.

  6. Mix water and masa harina to form a dough. It should not be too sticky and malleable

  7. Roll into 50g size balls and place between two baking sheets, plastic or in a tortilla press.
    Gently press until the disc is around 1cm thick and 8cm wide. Repeat

  8. In a cast iron pan, heat on medium, and dry fry the discs, they can be slightly brown on each side

  9. While they are still warm, pinch the edges to create a ‘lip’ around the outside of the discs

  10. Heat the oil in a pan on a medium-high heat and cook the sopes on each side until crispy

  11. Set aside and top with bean mixture, sliced avocado, cheese, coriander and hot sauce

  12. Indulge in the simple delights of Sopes… and you can read more about it HERE.


    Questions? Comments? Let me know, I’d love to hear from you.

     Buen Provecho!


Ready to bake? Try some of these quick and easy recipes..

Jicama & Apple Salad


The Recipe

Serves: 2 people
Preparation: 10 minutes
Assembly Time:1 minute!

“From its glorious origins in Mexico, Central and South America, Jicama made the long journey to Asia in the 17th Century”


Amongst the plethora of street stalls in Mexico City, I remember the fruit carts that were neatly prepared, and too irresistible to walk past without purchasing a cup of jicama, mango, or papaya sprinkled with chilli, salt, and a squirt of juicy Mexican lime. This was not the first time I had eaten jicama, but it was the first time I had seen it served in this way – cut like thick fries and eaten raw.

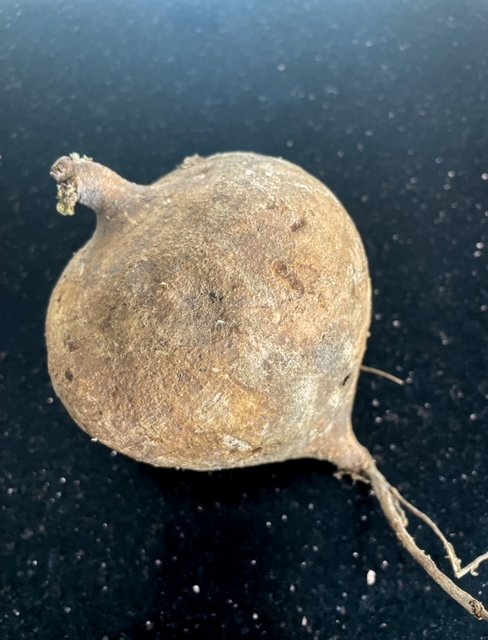
Although Jicama looks like a root vegetable, it is the root of a pea plant (Fabaceae family) that spouts out from the top of it. The crispy and juicy Mexican turnip, Jicama (pronounced “Hee Ka Ma”) is derived from the Nahuatl word xīcamatl.

Where is Jicama from?

 The origins of this vegetable lie in Mexico, Central and South America and it is known to be one of the oldest cultivated crops – even the Mayans munched on it back in the day. There have been traces of Jicama found in archaeological sites in Peru that date back around 3000 years.

 Jicama most probably journeyed from the Americas to Asia with the help of the Spaniards. It is now a common ingredient found all over the world and is a popular element in dishes from popiah in Singapore to rojak in Indonesia.


What does Jicama Look Like?

With a rustic exterior, Jicama has fibrous skin yet a fleshy interior. It is made up of around 90% water and it has a glorious ability to absorb flavours ever so well.

What does Jicama Taste Like?

If you haven’t tried jicama, you will be pleasantly surprised. With its deceiving root vegetable costume, it is not at all starchy, yet has a juicy texture similar to a nashi pear with a little bit more structure. It can be eaten raw or cooked and thrown into savoury and sweet dishes.

Enough of the history lesson, here’s the recipe.


INGREDIENTS

Salad
280g jicama
60g / half red apple
30g water celery or watercress (rocket works too!)
1 tbsp / 10g raisins
1 tbsp / 5g pumpkin seeds

Dressing
1.5 tbsp lime juice
½ tsp pepper
¼ tsp salt
2-3 tbsp extra virgin olive oil
1 tbsp habanero hot sauce (or any sauce you wish)

METHOD

  1. Wash jicama, red apple, and water celery/watercress.

  2. Trim the thick stalks of the water celery and save later for a veggie stock.

  3. Peel jicama and cut into 1cm thick sticks

  4. Keep the peel on the red apple and slice it a little thinner than the jicama

  5. Mix the salt and pepper in the lime juice and mix until the salt has slightly dissolved, add in hot sauce and olive oil.

  6. Mix until all dressing ingredients are combined.

  7. Place the dressing, apple, and jicama in a bowl and mix to thoroughly coat them, allow to sit for a minute or two.

  8. On a plate, place half the jicama/apple mixture and then add some of the water celery.

  9. Pile the rest of the jicama and apple and then the watercress. Arrange as you wish!

  10. From a reasonable height, flutter the pumpkin seeds and raisins down on the salad.

  11. Add a small amount of the remaining dressing to finish.

  12. Enjoy the crunchy and fresh simplicity of this healthy salad.

  13. For extra oomph, feel free to add some crumbled fetta cheese.


    Questions? Comments? Let me know, I’d love to hear from you.

     Buen Provecho!


Try some mains to go with this Jicama Salad!

SOME OF MY FAVOURITE HOT SAUCES ON AMAZON

Gochujang Felafels with Garlic Sauce & Crunchy Cabbage Salad


The Recipe

Serves: 4-6 people
Preparation: 30 minutes
Cooking Time: 15 minutes

“Felafels are known to be of Egyption origins, yet every country seems to put their own spin on this delicious heart snack. Pair it with good toppings and you have a match made in heaven.”


Inspired by my article on Jang and the wonderful world of Korean sauces, I came up with this far-from-traditional Korean dish. If you know me I love both Middle Eastern and Mediterranean food. I used a readily available Jang - Gochujang to come up with these pita pockets to show that Korean sauces go way beyond soups and marinades.

Make the felafels in advance or freeze them if you wish!

THE INGREDIENTS

Felafels
2 x 250g canned chickpeas
3 tbs generous tbsp gochujang
2 tsp minced garlic
120g/1 medium onion, finely chopped
3 tsp sesame oil
4 tbsp gangjang/soy sauce
3 tbsp rice wine vinegar
160g plain flour
Salt to taste
Handful of chopped coriander
Handful of chopped spring onions
Fine sea salt
Vegetable oil for deep frying

Yoghurt Garlic Sauce
240g good thick Greek yoghurt
2 tbsp lemon juice
2 cloves of finely crushed garlic
Salt to taste
Combine all ingredients, taste and adjust
seasoning
Allow to sit in the refrigerator until ready to serve

Cabbage Salad
½ small purple cabbage
1 x nashi pear (or green apple) sliced into matchsticks
2 tbsp sesame oil
¼ cup chopped coriander leaves
¼ cup finely chopped green onions
Sea salt to taste
Mix all ingredients just before serving. Add more oil or salt if needed.

10 x pita bread pockets*

THE METHOD

  1. Drain the chickpeas (you can reserve the aquafaba which works as a great vegan substitute for egg white)

  2. Place the chickpeas, garlic, onion, gochujang, sesame oil and rice wine vinegar in a food processor

  3. Blend until the mixture is well incorporated and smooth

  4. Add in the plain flour in three parts (you may add more if needed). The flour binds the ingredients enabling the felafels to be shaped and fried easily

  5. Lightly blend in the coriander and mix the spring onions by hand. Taste the mixture and add some fine sea salt if needed

  6. Allow to set in the fridge slightly while you make the garlic sauce and cabbage salad

  7. In a medium saucepan, heat the vegetable oil and prepare to fry the felafels. The oil will be ready if you sprinkle a bit of flour or the falafel mixture in and it sizzles right away. When frying, watch the oil carefully as the felafels will brown quickly. After frying, take out the felafels and place on a paper towel.

  8. You are welcome to pop the felafels in the oven (1bout 180’C for 10-12 minutes) after drizzling them with olive oil, however, they won’t obtain a crispy texture

  9. Assembly; Cut the pita bread in half and slice to create and opening.

  10. Place the cabbage salad in the half pitas and add the felafels, drizzle with yoghurt sauce and top with sesame seeds.

*you can buy the pita pockets or make your own HERE

Beetroot Salmon

The Recipe

Serves: 6 people
Preparation: Overnight
Assembly: 10 minutes

Amongst a slathering of cream cheese squeezed with some good rye or a spongy bagel, who doesn't like a bit of cured salmon?

This old school way of preserving fish dates back to the middle ages - this is known as gravlax and finds it's origins in Nordic countries such as Finland, Sweden, Denmark and Iceland. The Nordic fisherman used to bury salted and fermented salmon in sand.

However, the actual process of curing fish is known to have begun 3000 BCE, Mesopotamia where salt and sesame oil was used in the process.  As Phoenicians started trading salt, it became commonplace in the Mediterranean so the Greeks and Romans began developing their own methods of curing fish, meat and developing some pickling methods.

The idea of curing salmon imparts and infuses flavour into the fish while under a heavyweight and the salt brings out the moisture - enabling the fish or meat to be preserved for long periods of time.

This recipe is a quick and easy way to prepare fish without using heat or too much effort. The end result is impressive in colour and surprising in texture...

THE INGREDIENTS

600g salmon, de-boned
10g dill, leaves only
300g sea salt
500g fresh beetroot
100g white wine vinegar
20g dijon mustard
50g white caster sugar

THE METHOD

  1. Peel and cut beetroot into rough cubes

  2. Blend the beetroot with mustard and white wine vinegar until it makes a nice paste, set aside

  3. Blend the salt, dill and sugar in a spice grinder or this will work in a blender as well

  4. Line a tray with 2 layers of cling film

  5. Line the cling film with half the amount of beetroot mixture and half the amount of the dill salt mixture

  6. Place salmon on this mixture and then pour the remainder of the salt and beetroot on top of the salmon

  7. Wrap the salmon firmly with cling film.

  8. Place in a box and place a considerable amount of weight on the salmon. This will squeeze out extra liquid or moisture from the fish which is ideal for the curing process. Try a few kilograms of flour, wooden boards or containers filled with water.

  9. Store the fish like this overnight

  10. Drain of the excess liquid and wash the salmon well to remove all the salt.

  11. Slice thinly with a very sharp knife

  12. Serve on rye bread with dill, capers, red onions and a good creme fraiche or sour cream